
Recap: What is a Topic
Remember from the first part of this series, topics are a channel(a pipe), through which communication between nodes(sets of code) occurs. If you want to send sensor data from a microcontroller on a robot to another node on another machine(note how a machine can contain SEVERAL nodes), this would be the way to go.
Also, recall how a node can publish a topic and push data to it. Any other node on the network can anonymously subscribe to the topic and digest the information it can provide.
All good? Right then, let’s get out hands dirty with some code and some errors as well!
Format of this and future articles:
It is important to understand how this article will go. We will go through an example together. I believe that knowledge can only be attained through practical examples.
Task 1
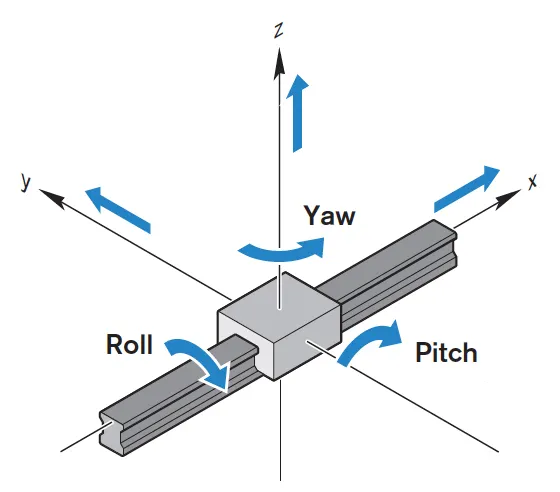
We have a gyroscope on the robot that is publishing data in this format:
|
|
NOTE: The Format and Axis are NOT part of the data. They are just extra information I added.
Data Formatting
We must first consider the format and structure of the data. This is not multidimensional data or a specialized format like an Image or Audio sample. This makes our life very easy.

Next, we must consider the amount of data and its relationship. The roll, pitch, and yaw axes correspond to each other so it is impractical to send them individually like this:
|
|
ROS has the functionality to make a custom topic type that incorporates 3 Float64 in a single message. But, that is way more complicated and beyond the scope of this article(there may be an article on this soon though).
We can also make this a comma-separated string. This way, we can send a single String message that contains the following information:
|
|
The subscriber can then easily splice the string and extract their information. That won’t be too intensive and still maintain the time-dependent structure of the data.
Programming
Making the ROS Package
First, we have to make a ROS package which will be our node. That node will contain the code to make a topic and publish the message. There is a built-in command to do this using catkin.
First, though, navigate to the workspace:
|
|
NOTE: You MUST be in src.
Then run this:
|
|
Yikes! That is a lot so let me break it down.
- First, we have
catkin_create_pkgwhich is the base command. - Next comes the name of the package, in this case
basic_ros_topic. This can be anything. - Then, we add all the dependencies of the package. Here, we have 3:
std_msgsrospyroscppstg_msgsis a ROS package that contains a bunch of data types likeFloat64,String,Int64, and more!rospyis a library that contains methods for using ROS with Python. This is what we will use today.roscppis a library that contains methods for using ROS with C++. We will NOT use this today.- On a side note: ROS also supports Java, Lisp, and some other languages too!
Everything that is mandatory to install has been done. Now on to the optional stuff.
These parts are really self-explanatory. It includes the license, description, author, maintainer, and version.
You don’t need this but it is a good practice to keep.
Now, list the files in the directory. You will see this:
|
|
Go to basic_ros_topic and list again.
|
|
CMakeLists.txt— contains all the info catkin needs to compile the project. It contains a list of the libraries, files, packages, and other stuff it has to compile. We will come back to it later.package.xml— contains info like package owner, description, version, maintainer, license, etc. We filled some of it earlier. The only important thing in it is the dependencies definitions. Our command already did this previously.
It looks like this:
|
|
That bottom part with the buildtool_depend and build_depend statements define the important stuff.
Navigate to the src within that. Now you should be in USERNAME/catkin_ws/src/PACKAGE_NAME/src.
Here is where we put all of our code! Make a file called GyroPublisher.py. Again, names aren’t super important.
Here is your file structure right now:
|
|
Now let’s start on the code itself. First, you have to import the rospy and std_msgs.
|
|
Now we make the function that publishes the actual messages.
|
|
And then we can run it with this:
|
|
IMPORTANT: You much make sure that your Python file is executable. sudo chmod +x GyroPublisher.py
Go the CMakeLists.txt and add our python script to the file. This will make sure that catkin will compile it.
|
|
Now go back to catkin_ws. Run catkin_make. Source the directory source devel/setup.bash.
Running the Node
Start roscore: roscore. Now, start publishing: rosrun basic_ros_topic GyroPublisher.py.
Check the node using rosnode list. We will see our GyroData node with a bunch of numbers since it is anonymous.
Check the topic using rostopic list. We will see our gyro_rpy topic. We can actually see the data using rostopic echo /gyro_rpy:
|
|
Receive Data Programmatically
Import libs:
|
|
Define callback to log:
|
|
Make the subscriber node:
|
|
Run the script:
|
|
Again, remember to change the permissions of the file. And run it the same way as the publisher.
Conclusion
In this article, you learned how to make Publishers and Subscribers in ROS. If you encounter any errors or have any questions, leave a comment. I will try my best to help you. I hope you enjoyed it. If there is a particular topic in ROS that you want me to cover, let me know in the comments as well!